
Why am I doing this oh god

More photos of the finished costume can be found here.
Sword Art Online II Silica (ALO ver.) progress can be found here
Skip to:
Cost of the costume are shown by part. Prices in parentheses are the costs if all of the raw materials had to be purchased instead of using leftovers or whatever is available in the house.
REFERENCES
Official production art from Dengeki’s release of Sword Art Online anime news.


Magazine spread scan.

I color-sampled the character art from official website for actual colors.
Silica’s red blazer is a true red. Same color as gloves.
All yellow/gold parts appear to be the same color.
All dark gray/black parts appear to be the same color.
Hair bobbles and ribbons are different shades of red than the blazer and each other.
Numerous amateur Silica costumes were consulted for ideas.
SKIRT
Cost: $6.68 ($13.28)
Materials: Caviar stretch poplin, heavyweight interfacing, black thread, black invisible zipper, snaps, gold pleather trim, goldenrod thread
For the skirt, I used stretch poplin in caviar left over from a past sewing project (I think it might’ve been an aborted attempt to make the AIR school uniform…).
Silica’s skirt has 10 box pleats, centered. It sits about an inch or so below her waist. Scaled to me, the pleats came out to be 2.5″ wide and the skirt body was 10.5″ long. The waistband was 1.5″ wide.

The skirt took up a 49″ X 25″ piece of poplin.
The pieces are as follows:

The heavyweight interfacing for the waistband pieces was also left over from another project (Persona 4‘s Teddie from PAX 2012).

The skirt body was sewn together on the right side with a french seam.
I also pressed the left hems inward and finished them in anticipation of the zipper.

The waistband pieces were also sewn together on the right side, thought just a regular seam.

The left side of the skirt body was fitted with a black invisible zipper.
This was the best invisible zipper installation I’ve done so far.

I shortened the 9″ invisible zipper down to 6″.

The top hem of the skirt body was basted all the way around.

I added the waistband to the top of the skirt body and removed the basting. The longer tab on the waist is the front piece.

I finished the ends of the waistband first.

The rest of the waistband was folded, pressed, and finished.

The bottom hem of the skirt was finished as well.

I attached two pairs of snaps on the waistband for closing the skirt in addition to the zipper.

The best part of the skirt has come! I’ve been waiting for this!
So I was looking high ‘n low for a good gold/yellow trim to on the skirt, keeping in mind that it needs to match other bits of gold/yellow trim on Silica’s outfit. The only bias tape available at Jo-Ann was this super tacky & shiny gold lamé tape stuff, which I’ve bought before and I disliked the resulting appearance. Straight plain yellow looked too flat and ‘weak’ for a fantasy-type costume. In the end, I decided to take a somewhat harder route by buying PVC trim in the only width available at my local Jo-Ann store.
PVC is annoying to sew, since it’s relatively sticky and all puncture wounds are permanent, but this seemed to be the best option available for now.
I cut the 1.5″ wide PVC trim into 3/8″ wide strips.

Then there was the tedious task of pinning the PVC trim without puncturing it (except the very ends) and getting the sewing job right on the first try. I used goldenrod-colored top thread and black bottom thread.
I broke a total of two needles on this skirt: a new record. I usually get through an entire costume without breaking a needle.

I folded the PVC and pressed the skirt on the silk/nylon setting on the inner side.
The skirt is finished.

Test fit.

CROP TOP
Cost: $6.85 ($7.82)
Materials: Black cotton/spandex knit, black thread, gold elastic trim, goldenrod thread
I picked a cotton spandex fabric to make Silica’s sleeveless mock turtleneck crop top. Originally I considered using this length of nylon/spandex fabric I had leftover from a Madoka costume, but the black didn’t match the skirt as well and the synthetic nature of the fabric felt worse on skin.
The top pattern looked simple enough to draft from scratch. It still took several hours.
The pieces are as follows:

The pieces really loved curling up on themselves. At least they didn’t fray at all (unlike the skirt…).
I finished the edges with an overedge stitch and pressed the pieces, which fixed the curling problem.

Sewed up the darts on the front bodice.

Sewed up the shoulder seams, joining the front and back pieces together. I also reenforced the seam with two more rows of stretch stitch.

I sewed the neck band to the top of the bodice.

I debated for a while whether or not to add a zipper to the back of the top because I didn’t think the neck hole could stretch enough to accommodate my head (13.75″ circumference stretching to 21.5″). Turned out it could.

The neck band was folded down over itself to finish.

The 1/8″ gold elastic trim finally arrived.

At first, I tried to do two rows of stitching for the trim, but it was very difficult and I realized that sewing it down the center sufficed.

I sewed the sides of the top together and reenforced them as well.

I folded the hems of the armholes in on themselves and sewed them that way.

Test fit showed that the top did need an underbust band to make it sit a little more securely around my torso.
Added:
The band pieces were finished around the hem first like with other top pieces, then sewn to each other. The band was then sewn onto the bottom hem of the top.

I finished the underbust band by folding it back up on itself.
Finished top.

Test fit.
It turned out that the top fails to hide regular bra straps, so I may have to consider either going braless or modifying an existing pair.

BOOTS
Cost: $15.81 ($22.33)
Materials: Black leather shoes, gold pleather trim, Fabri-Tac, black elastic thread, goldenrod thread, black Copic pen
The first dilemma that I faced with Silica’s shoes is the fact that they’re flat-bottomed. None of the characters in Sword Art Online have anything resembling heels going on and this is a fantasy game where real-life physics shouldn’t matter. It has led me to believe that the original artist simply didn’t know how to draw heeled shoes or refused to do so (or some hand of Kawahara working there). At any rate, shoes with no heels don’t look as good in photos, at least not in this costume’s case. I decided very quickly that I’d trade off a bit of accuracy for presentation.
I purchased a pair of black leather mary-jane shoes with 1″ heels from eBay. Size 3. They’re very comfy.

I cut out two 3/8″ strips of gold pleather trim to go around the openings.

I glued the trim on with Fabric-Tac. A small snip was made in the trim at the heels to account for the curve.

The gold trim went on in two parts, because the trim I worked with only came in 1.5″ width. The part of the trim closer to the toes took up the entire 1.5″ width.

The straps across the shoes were 5/8″ in width and about 5.75″ long. The little holes at both heads of the straps were markings for where stitching would go.

The stitching was decorative for one end and both decorative and for holding hidden elastic on the other end.
I still wanted to preserve the buckle function of the shoes (I couldn’t bear to cut or remove the buckles), so the buckle end for the gold trim was held down by elastics instead.

I glued the trim for the straps on up to the tightest buckle hole and slipped the end of the strap through the elastic on the back of the trim.

The finishing touch was using a permanent pen (Copic Multiliner) to color in the tan stitches visible on the shoes.
The shoes are finished.

Test fit.

SOCKS
Cost: $6.28 ($29.01 + $3.99 wasted)
Materials: Black thigh-high socks, elastic, golden yellow dye, orange dye, goldenrod thread, sock glue
Cospatio socks ♫ (They’re a bit big on me, at Size M, but so nice in quality)

I tried to look for gold (or yellow) 1/2″ elastic trim, to no avail. I ended up buying 20 inches of white 1/2″ wide elastic, which turned out to be too short, and I had to buy an additional 24 inches, which I cut into two pieces.

I thought I could color the elastic with a gold pigmented pen, but the color was very off, so that idea was scrapped (and the pen could not be returned).
I dyed the elastic with a combination of RIT dye (golden yellow) and iDye Poly dye (orange) to get a color match with the elastic trim on the crop top. I can’t remember what the yellow dye was left over from, though the orange dye was from dyeing some fleece for a Holo plush.

I sewed the ends of the elastic bands together. They weren’t very sightly, but the ends went in the back of the socks and hidden by the blazer.

I sewed the elastics by a single row of stretch stitching to the back of the socks only since they were nice socks and all and I didn’t want to ruin them any more than necessary. I might add one more row or use temporary glue later if they prove to be too difficult to stay in place.
The socks stretch a lot more than the elastic bands do.

Test fit.

I bought a bottle of sock glue (from Doremi Drug on Rakuten) for the first time to hold up the socks since they’re too big to stay up on their own.

Garter
Cost: $3.11 ($20.82)
Materials: Black pleather trim, gold pleather trim, silver pleather trim, black twill, elastic, black thread, Fabri-Tac, silver pen, gold pen, black pen snaps
I tried out something new here, gluing pleather strips to a fabric backing, which I haven’t ever attempted before.
The black strip is 0.875″ wide and the gold strips are 0.25″ wide. The fabric backing is leftover twill and about 1.375″ wide.

To give the garter a bit of stretch, I added a 2″ piece of elastic.

Joining piece of the garter added. I did 4 rows of stitching total in fear of the garter coming under stress and falling apart.

Duplicated the stitching for the other end of the garter to make a closed loop.
At this point, the fraying was starting to get on my nerves…

Then I glued the pleather strips onto the fabric backing with Fabri-Tac, middle black strip first, then the gold strips. I trimmed off the excess pleather and snipped off the stray threads.

I decided to make a fake buckle instead of using a real one so that it’s easier to customize to the desired width and reduce the weight of the garter.
The buckle was made from two layers of silver pleather glued back-to-back. So was the tine.
The buckle was 1.625″ tall and 1″ wide. The tine was a little under 0.25″ wide.

There was an incision on one side of the buckle that would go behind the garter so that it could be put on. I also cut very shallow grooves into sides of the garter for where the buckle would go for a slightly indented look.

I scratched up the appropriate surfaces on the garter and buckle with sandpaper for a better hold and glued them together with Fabri-Tac.
It appears that whoever was the original designer for Silica’s outfit can’t into buckles. The buckle on Silica’s garter is facing the wrong direction for it to be functional.
I used a soldering iron to burn a hole into the garter for where the tine would come out if it was a real buckle.

The tine was also sandpapered before being glued into the hole and buckle.

I colored in the edges of the garter with gold and black pens.
I may add a snap to the back of the garter for easier positioning over the sock, though I’d need to wait a day or two for the glue to fully set and harden first.
Gloves
Cost: $2.71 ($11.83)
Materials: Red knit, red thread, black pleather trim, gold pleather trim, black twill, Fabri-Tac, hook and eyes, snaps, black pen, gold pen
I modified a pattern for gloves from Threads. I removed roughly the top half of the fingers and simplified the thumb hole and piece, as well as printing the pattern at about 6% smaller than called for.
This was my first time sewing a pair of gloves.
*If you use the below patterns, please remember to scale them up to the needed size before printing.


Cut pieces. I used a rib knit for the glove bodies. The cutting lady at JoAnn told me that the rib knit doesn’t have a right or wrong face, though upon closer inspection (and seeing the fabric curl in a particular direction), I concluded otherwise.
The fabric strip in the lower left is about 0.6″ wide and for the gusset pieces between the fingers. This wasn’t the only strip that I used; I continuously cut more pieces as each gusset got used up.

Right is gussets sewn to the glove body on one side, left is sewn to both sides. The seam allowances were 0.125″, so they were all hand-sewn.
I sewed the sides of the gloves together.
I also sewed the thumb pieces to themselves on one side, and it’s obvious at this point that I’d need to trim a bit off the tops.

I hand-sewed the thumb pieces onto the glove bodies. I shortened the thumb parts by about 0.75″ from the top.

A bit of simple finish to the bottom hems of the gloves to stabilize them.
I should’ve done this first before sewing the sides together.

The finger holes were too difficult to finish by sewing, so I ended up using Fabri-Tac to glue down a narrow 0.1″ hem instead.

Wristband pieces. Like the garter, the gold pieces are 0.875″ wide and the black pieces are 0.25″ wide. The backing is twill and 1.375″ wide.

I finished the ends of the twill backing pieces by folding them 0.375″ back on themselves.

I noticed that the wristbands are almost always detached from the gloves (and fall down when arms are raised) in a lot of other Silica cosplays I’ve seen.
This is the part where I messed up and lost about 2 days’ worth of work. I originally sewed 4 pairs of snaps on the ends of the fabric backing to anchor them to the gloves. I failed to take into account that the fabric would stretch a lot, which created gaps between the wristband ends. I tore off the snaps and installed hook and eyes at where the snaps were and sewed snaps to the middle of the wristband instead, at spots where they would coincide with the left and right sides of each glove.
If I’d done this part without the mistake, all of the sewing would’ve been completed before the pleather trim was glued on.

Pleather trim glued on with Fabri-Tac. I took care to press and stretch each piece in a curve.
Left is after trimming off all of the fraying fabric strands.
I also used black and gold pens to color in the sides of the wristbands.

I sewed the corresponding snaps onto the sides of the gloves. 2 each.

Finished gloves.
The seams of the wristbands are on the undersides of the wrists.
The gloves would follow a certain order to put on (put gloves on first, snap the wristbands at the sides, then hook the wristbands).

Circle Lens
Cost: $20.72 ($20.72)
Super Pinky Bright Red circle lens. I won’t be using them until the day of the convention.
I’ve tried various circles lens in the past and the ones that worked the best on dark brown eyes in my experience are EOS New Adult and Neo Sunflower series. Dolly+ works fine, but it’s too solid and unnatural.

Blazer (Bottom)
Cost: $39.07 ($46.88)
Materials: Red denim, sewing machine needles, red thread, red invisible zipper, gold pleather trim, goldenrod thread, Fabri-Tac, red lining, snaps
*The blazer bottom is relatively pricy due to having purchased fabric for both the top and bottom halves in one cut and overestimating the amount of fabric needed.
If I could do this over again, I DEFINITELY wouldn’t use the gold pleather for the trim but would have made gold bias tape out of satin instead. The pleather trim cost me a pretty penny and caused so much headache in construction.
The blazer came in two parts and I tackled the bottom half first.
I considered using linen like I did for Recette, though it looked too rough. Denim seemed to be the best match in terms of texture and drape. It still hurt my eyes badly to work with it, since it was a true red.
I spent two days drafting a pattern for the blazer bottom. The pieces are roughly 31″-33″ long and 15″ wide.
The waist was set to 26″ around to accommodate the skirt waistband and crease a little bit once the belt is on.

I sewed the front pieces together and the backs pieces together. There is a 9″ red invisible zipper installed between the back pieces. The denim could stretch from 26″ to 31″ to fit over my hips, but I scrapped the no-zipper idea quickly when I remembered that I’d need to line it.

The front and back pieces were sewn together.

Gold pleather trim was cut to 0.625″ width and sewn around the bottom hem. Since the trim had no stretch, pieces are cut at the corners and I joined them together with Fabri-Tac. I pressed the trim gently from the backside with the iron on silk/nylon setting to smooth out the thread tension and wrinkles.
If I could redo the blazer bottom, I would sew the outer shell and inner lining layers together first and sew/glue the pleather trim on instead. Freehanding it wasn’t the best idea after all.

The blazer belt, or “butt belt” as Bastille called it.
It miraculously turned out to be a purely straight belt with no curvature, which meant that I got the angle of back seam correct by sheer luck.
Two pieces, one denim (outer shell) and one lining.

I sewed the two pieces to each other and cut out 30″ of 0.375″ wide gold pleather trim.

I glued the pleather trim onto the belt with Fabri-Tac and cut out the pleather trim for the ends of the belt.
I also trimmed off the fraying edges of the fabric and used some Fray Check to keep the lining from fraying further.

I glued the belt end trim on and cut off the excess trim.
Finished blazer belt.

I attached the blazer belt with a combination of sewing and gluing.


Pina’s Heart
Cost: $1.49 ($1.49)
Materials: Blue feather
Possibly the simplest part of the whole costume.
My crafting and plush-making skills are very low, low enough that I was confident that I wouldn’t be able to make a good-looking plush prop of Silica’s Featherydra familiar, Pina.
I chose to make the feather item 《Pina’s Heart》 to carry around instead.
Base feather: some sort of 10.25″ long blue rooster feather with a semi-transparent/white outer edge.

I took a pair of sharp scissors, cut the feather to roughly 5″ long, and trimmed off bits until it resembled the feather from episode 4 in the anime.
Finished feather.

Wig
Cost: $23.06 ($33.42)
Materials: Wig, hair elastics, plastic bottles, red pearl paint, red ribbon, polyester dye, hairspray
This is the base SHIRIKA wig in burnt caramel from Lucaille on Taobao. Right out of the bag, I saw that the bangs needed a good trim and the pigtails were too high. The pigtails need to be thinned and fluffed up as well.

In addition to the bad placement of the pigtails, the wig overall was too big for my tiny head, so I took out the pigtails and redid them to fit.

I trimmed the bangs and side hair first.

Figuring out what to use for the hair baubles took a while. I discussed it on and off with Keisos for about 3 weeks before hitting upon the idea of using plastic ornaments and he recommended this to me:

Keisos and I cut holes into the sides of the bottle ornaments and hacked off most of the original openings. I sanded the cut edges down a bit as well. The holes are about 1″ in diameter.
We also tried (without success) to squash down the ornaments a bit, but the ornaments immediately shriveled when exposed to heat and we gave up on that venture.

I painted the ornaments from the inside. I masked the holes on the ornaments and squeezed in pearl finish red paint (Martha Stewart Multi-Surface Pearl Acrylic Paint in Holly Berry) with a bit of water to make it less viscous. I shook the ornaments until all surfaces were covered and left them on paper towels to dry, turning them once every few minutes to fill in bubbles and keep the paint evenly distributed.
Despite my best efforts, the paint still got everywhere. Prop-making has never been my forte.

After the paint settled, I peeled off the masking tape and left the ornaments opening side down on paper towels for a day for the excess paint to drain out. When the paint fully dried, I carefully wiped off all dried paint on the outside of the ornaments with isopropyl alcohol.

Then I wrapped the pigtails in Saran wrap, fed them through the hair ornaments, and used a corkscrew motion to slide them on and over the hair elastics.

I teased the pigtails with a wide-toothed comb and hairspray to achieve this volume, though it became evident that the pigtails were just too full and needed to be thinned down.

I wanted ribbon in 7/8″ width and cranberry color, but JoAnn carried only the right color in the wrong width, or the right width but wrong color. I settled with buying 50″ of red ribbon in the right width and dyed it darker with a bunch of leftover dyes I had. I’m not sure how a mix of green, orange, wine, and black dyes worked, but it did.
The skinnier red ribbon to the left is the color that the Silica ribbon was at before the dye job.

I trimmed the ribbons to the needed length with a soldering iron so that the ends were simultaneously sealed without the bulk of sewing.

I tied the ribbons onto the pigtails and used pliers to pull them out through the bottom openings on the hair baubles.
After some advice from Sonteen, I thinned out the pigtails some more and applied liberal amounts of got2b Glued Freeze hairspray into them, using a piece of paper to shield the hair baubles and ribbons from the spray (the hairspray is a dissolvent on the ribbons). I teased the pigtails into upturned tails before brushing again with a wet wide-toothed comb to bring them back down.

Finished wig. The wig is back-heavy and the wig head can’t support the weight without tipping over.

Blazer (Top)
Cost: $15.08 (19.43)
Materials: Red denim, McCall’s 6856, Butterick 5258, red lining, interfacing, red thread, gold pleather trim, goldenrod thread, fabric glue, snaps
If I could do this over again, I DEFINITELY wouldn’t use the gold pleather for the trim but would have made gold bias tape out of satin instead. The pleather trim cost me a pretty penny and caused so much headache in construction.
*The blazer top is relatively cheap due to having purchased fabric for both the top and bottom halves in one cut and the costs were added to the bottom half.
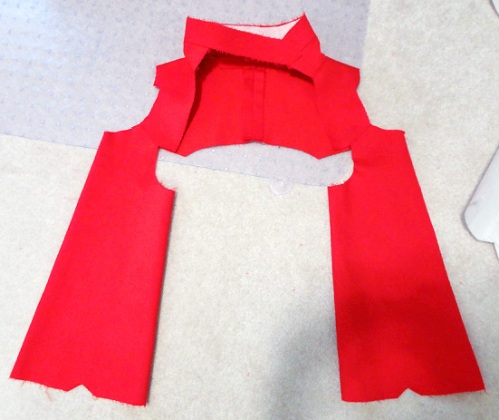
I spent a day or two drafting the pattern for the top half of the blazer. I used McCall’s 6856 as the basis for the bodice (left over from a CLANNAD skirt) and Butterick 5258 for the sleeves (left over from Umineko’s Ange).

I stay-stitched the bodice pieces around the neck hole. The back pieces were sewn to each other first, then sewn to the front pieces.
I ironed heavyweight interfacing to the collar piece. The neckband was sewn to the collar, then trimmed and clipped for the curve.
The sleeve pieces were sewn to themselves like tubes, which I should’ve done after attaching the cross-shaped decorations, not before.

The neckband and sleeves were sewn to the bodice.
The cross-shaped decorations were cut from the gold pleather trim. They are 4.25″ tall and 2.83″ wide.
I had marked out where to put them on the sleeves (centered) and I glued them down with Fabri-Tac first. Then I stitched around the outside and the middle to reinforce them and use a sharp edge to engrave the details.

I made the inner lining of the blazer top in the same manner as the outer shell but without interfacing.
I sewed the two layers together at the shoulders first with a regular seam, then sewed all other hems together as if basting.

Here is the most tedious part of the blazer: cutting out all of the gold trim and gluing them on.
The front side has 0.3125″ wide trim.

The back side has 0.625″ trim in the middle, then narrowing by 0.0625″ for each piece while going toward the sides since the trim is continuous from the front to back.

Once the glue dried, I stitched around the trim.
I’m pretty clumsy with glue, so there are small bits of dried glue on wrong parts of the costume here and there. I’ll be picking them out with a bottle of isopropyl alcohol and sharp edge to kill time before the con.

All of the outside trim glued & stitched on. Note that the shoulder holes don’t have trim all the way around, because the shoulder belts would later cover them up.

The shoulder belts were made in the same way as the blazer butt belt. I cut a top layer from denim and a bottom layer from lining. They are 11.625″ long and 1.375″ wide. The belts also miraculously turned out to be completely straight, meaning that the blazer top was proportioned and angled correctly.

I stitched the two layers together and cut more 0.3125″ wide trim from gold pleather.

I glued the strips of trim on first, then added the trim for the ends.

All of the trim completely glued & stitched on the belts.

I pinned the belts in place, then glued them down on the sides. I didn’t need to stitch them down, nor did I want to, since the lining was already in place and stitching tightens the fabric.

I glued a bit of trim to the back sides of the belts were they weren’t on the blazer to give the illusion that they’re separate.
I also glued the inner layer of trim onto the blazer, which was equally tedious as the outsider layer.

Sleeves with inner layer of trim glued on an decorative stripes on the outside. The decorative stripes weren’t actually stitched down (the stitching holes have no thread). At this point, the combination of glue and pleather was strong enough to prop up the blazer like a 3D sculpture.

The back side of the blazer with the inner layer of trim and decorative trim added. The points of the back ends of the shoulder belts are 6″ apart.

Decorative trim added to the top of the sleeves.

I added two pairs of snaps to close the collar band.

Finished blazer top.
Almost. I’ll be adding two more pairs of snaps at the collarbones to anchor the blazer to the crop top.

Belt
Cost: $0.62 ($9.60)
Materials: Black twill, snaps, black thread, black pleather, white pleather, Fabri-Tac, black pen
The belt was fairly straightforward.
First, I cut out the fabric backing pieces from black twill. The long strip is 1.625″ wide and 23.75″ long. The short buckle piece is 3.25″ long.

The belt would open and close in the front, so I added two pairs of snaps to one end.

I cut the outer layers of the belt out of black and white pleather. I chose to use a different pleather than the stuff that I’d been using for the garter and wristbands to add more textile variety to the costume.
The center black piece is 1″ wide and the white strips are 0.3125″ wide.

I used Fabric-Tac to glue the pleather down onto the fabric backing, center black strip first, then the white outer strips. I trimmed the ends of the black pleather to points. For the end of the belt with the snaps, I carefully cut a hole into the pleather so that the snap would pass through it.

I glued more white strips to the ends of the belt and cut another hole for the second snap. The end of the belt without the snaps was done in the same way sans cut holes, though I forgot to photograph it before gluing the buckle piece on.

I did a triangle of stretch stitching on the buckle piece to reinforce the attachment to the belt piece.
I also cut out the pleather layer for the buckle and engraved the design on with a sharp edge, then traced it with a black Sakura Pigma pen.

I glued the pleather layer to the fabric buckle backing.
The belt is finished.

Pouch
Cost: $0.00 ($5.60)
Materials: Black twill, black thread, Peltex interfacing, heavy interfacing, gold pleather trim, goldenrod thread, Velcro, Fray-Check


Good work 🙂
It’s looking great so far. I think the pain of the PVC trim was well worth it.
Thanks! I hope so, too.
omg this is great thankyouu!!! btw how did you make the jacket (if you made it)?
Jacket will be posted when it’s close to completion. It is being made from denim with the same gold PVC trim as on the skirt and fully lined.
Can’t wait to see the jacket when it’s completed! The anklet looks like it’s floating. *is jealous of your skills*
What did you do for that thing on her ankle?
I plan to use fabric to make a donut and glue pleather on the outer surface. The inside will be stuffed with foam. I will post details once that part is completed.
OMG I LOVE YOU! ughh i was how the hell i was going to make my own! :DD if i culd i wuld giv you a bloody hug!
Can’t wait to see the finished costume. Also: I always wondered how those thigh socks stayed in place. Now i know ^^
Looks awesome!
How about these two SAO costumes?
http://www.skycostume.com/sword-art-online
Love it!!!!
Pingback: Going to Sakura-Con 2013 | {Words of Songs}
Your costume is looking marvelous! Where did you buy your pvc gold fabric from? Good luck!
I got it from my local JoAnn store, though I think it’s going out of production now.
this is great. really helps me to make one myself. makes it less intimidating
Great job! I really just wanted to thank you for posting this because i’ll be cosplaying as Silica for anime midwest this year and this will help a ton when i start working on it!
You should put a picture of you wearing the finished costume! It looks great! Awesome detail!
Updated at the top with complete cosplay.
Hi!! I’m planning to cosplay as Silica as well for an event called Supanova, I’m literally in love with your outfit, the best I’ve seen actually…I was wandering if you could explain to the attachment of the top blazer part… >_< so confused!
Reblogged this on Present Memories and commented:
Arggghh…it’s so perfect!! I love this cosplay! Getting my sewing skill up to date, so I can actually attempt this for Supanova!!!
This awesome!!!!!! thank you so much for doing this!!!! I love Silica and want to cosplay her ALO one to… could you possibly make one of that to please?
Yes, I’m working on SAO II Silica (ALO ver.) and the progress is posted here.
How did you do the gold spade shapes on the blazer and pouch? I’m going to make a Silica cosplay soon, and this is very helpful. ^-^
I drew the designs on the black of the pleather and cut them out by hand.
thanks! also, is there a pattern or anything to help get a good idea on how to make the blazer, or would i have to go without it?
I used McCall’s 6856 (older pattern) and Butterick 5258 as basis for the blazer top, but it’s simple enough to draft something from scratch for it if you know how to draft your own patterns.
Pingback: Sword Art Online II Silica (ALO Cait Sith ver.) Cosplay Progress | {Words of Songs}
what’s up with the cait sith version link? it’s not there 😦
The linked page will go private every now and then when it is being updated.
Hi!! When do you think you will finish this tutorial? I am going to cosplay as Silica for Anime Expo in LA but I am somewhat of a beginner costume maker, so I have no idea how to make the breastplate or anklet or dagger.
Are there any templates for the cross-shaped decorations? I’ve been looking for for days…. 😥 …..ehm and can you tell me what’s the name of these decorations?
I didn’t use a pre-existing template. I took the reference art and scaled them up on paper before tracing it onto gold pleather for cutting.